Wednesday, February 21, 2018

FREE Personalized Star Map Tutorial

February 21, 2018 0 Comments

Video Tutorial 


What you see in the night sky depends upon where you are on Earth. 
Have you ever wanted a keepsake to give or keep on that special day?  Well, now you can make one yourself or get one made.  This post will show you how to make one.  

Step-by-step chart making

  1. Go to the Your Sky Web site. (Link opens in a new window/tab.)
  2. Scroll down to the “Horizon View” section and click “Make Horizon View” button.  At this point, the settings do not matter.  Just press the button and don’t panic when you see the rather cluttered chart – you are going to modify your settings significantly in the form below the chart, then update it.
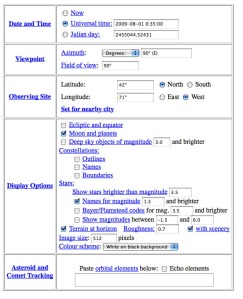
  3. Scroll to the form below the chart. You want to make it look much like the form to the right – but with your location and time. (Click the image of this form for a much larger view in a new window or tab.)
  4. You should uncheck most of the choices on the form to customize this chart. Here are the choices you want to make and what to put in each box. (The form at right is filled out in this way, but you need to substitute your specific information.)
    Click image of form to get a larger view in a new window or tab - you can then switch back and forth between windows, or print this new image out to help guide your choices.
    Click the image of the form to get a larger view in a new window or tab - you can then switch back and forth between windows, or print this out to help guide your choices.
  • Choose Universal Time and put in the Universal Time for the date and place where you will be observing. Remember to start your observing session 45 minutes after local sunset. (See “preliminaries” above for Universal Time and time of local sunset)
  • Your Viewpoint will be in “azimuth” and set to 90 degrees. That means you’re looking due east.
  • Set the Field of view for 90 degrees. This will cover your horizon from northeast to southeast. (If this doesn’t capture what you want, you can increase the viewpoint to 180 degrees, but this tends to distort. You may want to change the azimuth instead – “0” would be north; “180” would be south. And notice the “pan” buttons just below your chart that allow you to move your view to the right or left.)
  • Set the latitude and longitude for your Observing Site.  (See preliminaries.)
  • Leave most of the “Display Options” unchecked. You want a simple map.
  • Moon and planets”  should be checked because if there are any bright planets in the east they will look like stars and confuse you if not identified.  Planets are “wanderers” and one month may be there, and the next not. There are just three bright planets that might appear in the eastern sky in the early evening –  Mars, Jupiter, and Saturn.  (Mercury and Venus are seen only in the western sky in the early evening or the eastern sky in the early morning.)
  • The important settings are for the stars. Set “Show stars brighter than magnitude” to 3.5 – and check “Names for magnitude” and set it for 1.5 and brighter.  The first setting means that all the stars of the bright asterisms we use will be included, but none of the dimmer stars which aren’t visible until the sky is fully dark and generally add confusion. By naming stars brighter than magnitude 1.5 you will have names for all the guidepost stars we use with the exception of Polaris, the North Star – to have that named you would need to set this to 2.5 and be looking north (0) not east (90). (To learn about the magnitude system go here.)
  • Color scheme” is a matter of personal preference. I prefer  “white on black background” for computer display. For printing, you’ll use a lot less ink if you choose “black on white background.”
  • “Image size” I usually leave at 512 pixels. This really depends on your screen size. Try it. If too small and you have plenty of unused screen real estate, you can easily increase it.
That’s it. Just push the “update” button (between chart and form) and you will have a chart showing the bright stars – the ones that will put in an appearance about 45 minutes to an hour after sunset –  in the eastern sky for where you’re observing.

Friday, February 16, 2018

Sunday, March 29, 2015

FREE Mandrake pattern

March 29, 2015 0 Comments
Pattern by craftbits (shellie wilson) in knitting patterns, novelty 8 comments

This free knitting pattern shows you how to knit a Mandrake from the Harry Potter Movie. You can use them as party decorations or Party props. We have given you two different sizes.
Harry Potter Knitted Mandrake Pattern
What you need
4 mm needles
1x 50 gram ball of 8 ply wool
Green wool scraps
black wool for eyes
toy filling
Plant pot

Instructions

For the large Mandrake
Body (make 2)
Beginning at the bottom
Cast on 20 stitches
(And work in stocking stitch throughout.)
Knit 14 rows
( Knit 2 knit 2 tog) to the end ( 15 )
P1row
This completes the body pieces
Begin the head
(knit 2 knit twice into the next stitch ). To the end ( 20 )
P1row
Knit 12 rows
Knit 6 turn
purl 6 (continue on theses 6 stitches only ) in stocking stitch for 12rows.
Thread yarn through stitches do not fasten off at this stage
Now now rejoin the yarn to remaining stitches
Knit 2 tog knit 5 (Continue on these 6 stitches only) stocking stitch 14 rows.
Thread yarn through stitches do not fasten off st this stage .
Rejoin the yarn to the remaining 7 stitches
Knit 2 tog knit 5 ( continue on theses stitches and stocking stitch 12 rows
Thread yarn through stitches do not fasten off at this stage
Arms (make 2)
Cast on 14 stitches
Stocking stitch 12 rows
on the knit row knit 2 tog to the end (7)
Purl one row
Knit twice into every stitch. (14)
Stocking stitch stitch 7 rows
thread yarn through stitches and secure .
Use some scrap pieces of yarn for the tassel ends.

Make the face with black wool
Sew both pieces of the body together leave an opening at the bottom, fill with toy fill.
Now draw up the bottom but not too tight.
Before drawing up the ends of the arms insert the scrap pieces of yarn ( or stitch them to the end )
At the top of the head either insert scrap pieces of yarn or green felt for leaves.
Place in plant pot’ as if growing .

Small Mandrake Pattern
Materials needed:
4 mm needles
8 ply wool ( very small amount ) (choose the colour you like) I used light tan.
black wool for eyes
toy filling
Plant pot
Beginning at the bottom cast on 8 stitches
Garter stitch 8 rows
Knit 2 tog to the end (4 stitches)
Knit 1 row
Knit twice into every (8 stitches )
Knit 4 rows
Knit 2 tog knit 4 knit 2 tog ( 6 stitches )
Knit 1 row
Knit 2 tog knit 2 knit 2 tog ( 4 stitches )
Knit 1 row
Knit twice into 1 st and last st (6 st )
Knit 1 row
Knit twice into 1st and last st (8 st)
Knit 8 rows
Knit 2 tog knit 4 knit 2 tog (6 st )
Cast off
To make the arms and top sprouts
Top sprouts –Take 3 strands of wool and make a plat then secure the ends make (3)
Arms —– Take 6 strands of wool and make a plat then secure the ends make (2)
To finish off sew up the sides ,sewing the arms in place as you go now continue to sew around the head sewing in the top sprouts as you go.
Make the face features with black or brown wool.
Then fill very sparingly.
Arrange as if growing from a plant pot.
Mandrake with legs (no pot)

Materials needed
I ball of 8 ply wool
4mm needles
Cast on 8 stitches
Stocking stitch 8 rows
Row 9 )knit 2 together to the end (4 sts)
Purl 1 row
Row 11) knit twice into every stitch (8 sts)
Purl 1 row
Row 13) knit twice into every stitch ( 16 sts)
Stocking stitch 8 rows
Purl 1 row
Row 23 ) knit twice into the first and last stitch (18 sts)
Purl 1 row
Row 25) knit twice into the first and last stitch (20sts)
Purl 1 row
Row 27) knit twice into the first and last stitch ( 22sts)
Stocking stitch 10 rows
This completes the first leg set aside on a spare needle .
(Repeat for the second leg)
Now you are on to the body
Once the second leg is completed pick up the first leg stitches (44 sts)
Stocking stitch 30 rows Ending on a purl row
Knit 10 stitches and turn ( work on these 10 stitch
Stocking stitch 10 rows
Set aside this section (on a spare needle)
Now pick up 24 stitches and ( work on theses 24 stitches )
Stocking stitch 10 rows.
Cut your yarn and set aside ( as you did with the the first 10 stitches)
Now pick up the last 10 stitches and stocking stitch 10 rows.
Now pick up all your remaining stitches (44sts)
Stocking stitch 4 rows .( this completes the body )
To shape the neck (knit 2 knit 2 together ) to the end ( 33 sts)
Continue for the head
Stocking stitch 24 rows
Cast off this completes the full body
Stitch together with the seam down the back but remember to leave a gap for your toy fill
Fill very sparingly it is not meant to be fat
Arms ( make 2 )
Cast on 12 stitches
Stocking stitch 16 rows
Row 17 knit 2 together to the end (6 sts)
Purl 1 row
Knit 2 together to the end (3 sts)
Knit 3 together and fasten off
Complete the second arm and stitch into place
To make the sprouts use either felt or stands of
wool
Draw your face on with colored pens .


SOCK VERSION

Wednesday, March 4, 2015

Free Quiet Book tutorials and templates

March 04, 2015 0 Comments

New designs

Advanced designed pages


Shaffer-sisters/2013/04/quiet-bookEntire quiet book patterns:


Individual page patterns


Finger Puppet templates: