Video Tutorial
What you see in the night sky depends upon where you are on Earth.
Have you ever wanted a keepsake to give or keep on that special day? Well, now you can make one yourself or get one made. This post will show you how to make one.
Step-by-step chart making
- Go to the Your Sky Web site. (Link opens in a new window/tab.)
- Scroll down to the “Horizon View” section and click “Make Horizon View” button. At this point, the settings do not matter. Just press the button and don’t panic when you see the rather cluttered chart – you are going to modify your settings significantly in the form below the chart, then update it.
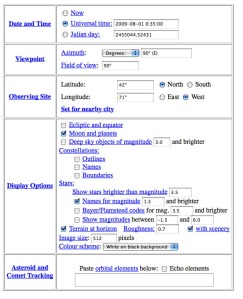
- Scroll to the form below the chart. You want to make it look much like the form to the right – but with your location and time. (Click the image of this form for a much larger view in a new window or tab.)
- You should uncheck most of the choices on the form to customize this chart. Here are the choices you want to make and what to put in each box. (The form at right is filled out in this way, but you need to substitute your specific information.)
- Choose Universal Time and put in the Universal Time for the date and place where you will be observing. Remember to start your observing session 45 minutes after local sunset. (See “preliminaries” above for Universal Time and time of local sunset)
- Your Viewpoint will be in “azimuth” and set to 90 degrees. That means you’re looking due east.
- Set the Field of view for 90 degrees. This will cover your horizon from northeast to southeast. (If this doesn’t capture what you want, you can increase the viewpoint to 180 degrees, but this tends to distort. You may want to change the azimuth instead – “0” would be north; “180” would be south. And notice the “pan” buttons just below your chart that allow you to move your view to the right or left.)
- Set the latitude and longitude for your Observing Site. (See preliminaries.)
- Leave most of the “Display Options” unchecked. You want a simple map.
- “Moon and planets” should be checked because if there are any bright planets in the east they will look like stars and confuse you if not identified. Planets are “wanderers” and one month may be there, and the next not. There are just three bright planets that might appear in the eastern sky in the early evening – Mars, Jupiter, and Saturn. (Mercury and Venus are seen only in the western sky in the early evening or the eastern sky in the early morning.)
- The important settings are for the stars. Set “Show stars brighter than magnitude” to 3.5 – and check “Names for magnitude” and set it for 1.5 and brighter. The first setting means that all the stars of the bright asterisms we use will be included, but none of the dimmer stars which aren’t visible until the sky is fully dark and generally add confusion. By naming stars brighter than magnitude 1.5 you will have names for all the guidepost stars we use with the exception of Polaris, the North Star – to have that named you would need to set this to 2.5 and be looking north (0) not east (90). (To learn about the magnitude system go here.)
- “Color scheme” is a matter of personal preference. I prefer “white on black background” for computer display. For printing, you’ll use a lot less ink if you choose “black on white background.”
- “Image size” I usually leave at 512 pixels. This really depends on your screen size. Try it. If too small and you have plenty of unused screen real estate, you can easily increase it.
That’s it. Just push the “update” button (between chart and form) and you will have a chart showing the bright stars – the ones that will put in an appearance about 45 minutes to an hour after sunset – in the eastern sky for where you’re observing.


No comments:
Post a Comment